# Rendering Layers
The Rendering Layers feature lets you configure certain Lights to affect only specific GameObjects.
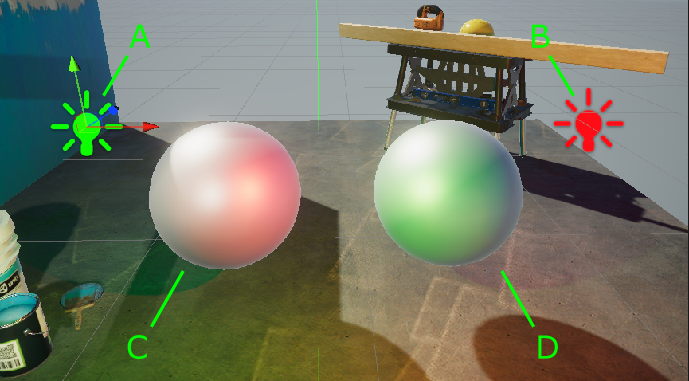
For example, in the following illustration, Light `A` affects Sphere `D`, but not Sphere `C`. Light `B` affects Sphere `C`, but not Sphere `D`.
To read how to implement this example, see section [How to use Rendering Layers](#how-to-rendering-layers).
## Enable Rendering Layers for Lights
To enable Rendering Layers for Lights in your project:
1. In the [URP Asset](../universalrp-asset.md), in the **Lighting** section, click the vertical ellipsis icon (⋮) and select **Show Additional Properties**

2. In the [URP Asset](../universalrp-asset.md), in the **Lighting** section, select **Use Rendering Layers**.
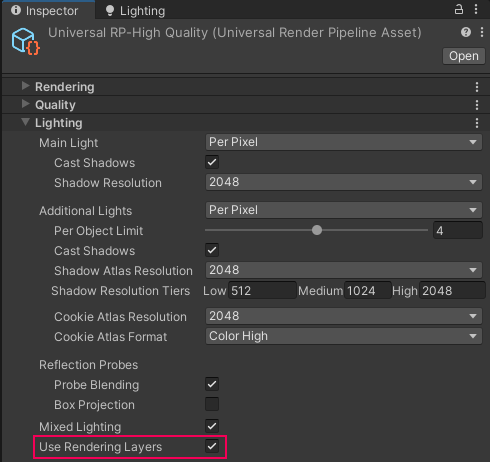
*URP Asset > Lighting > Use Rendering Layers*
## Enable Rendering Layers for Decals
To enable Rendering Layers for decals in your project:
1. In the [Decal Renderer Feature](../renderer-feature-decal.md#decal-renderer-feature-properties), enable **Use Rendering Layers**.
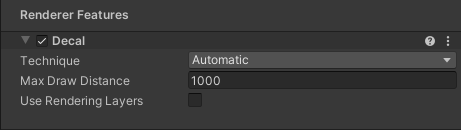
*Decal Renderer Feature, Inspector view.*
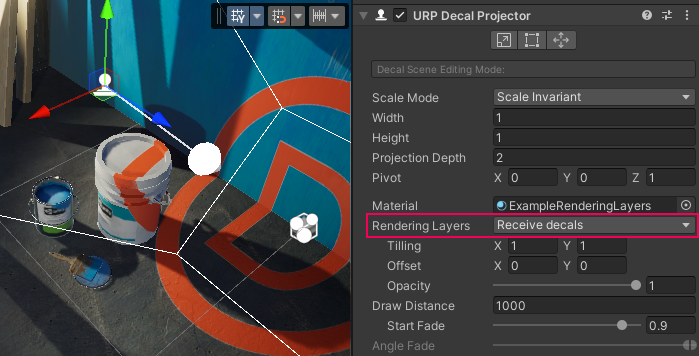
When you enable Rendering Layers for Decals, Unity shows the **Rendering Layers** property on each Decal Projector:
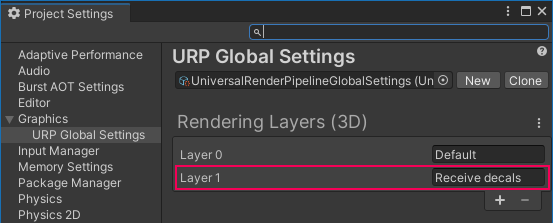
## How to edit Rendering Layer names
To edit the names of Rendering Layers:
1. Go to **Project Settings** > **Graphics** > **URP Global Settings**.
2. Edit the Rendering Layer names in the **Rendering Layers (3D)** section.
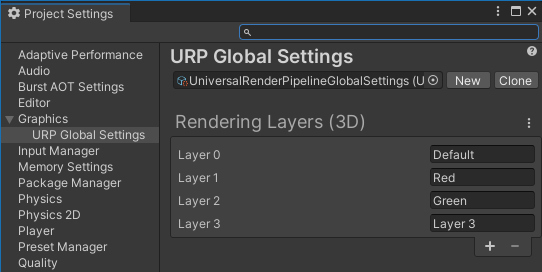
*Graphics > URP Global Settings > Rendering Layers (3D)*
## How to use Rendering Layers with Lights
This section describes how to configure the following application example:
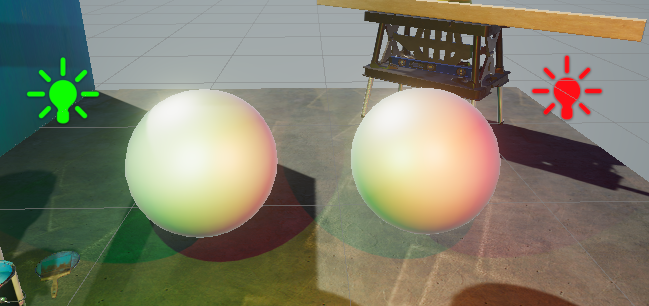
* The Scene contains two Point Lights (marked `A` and `B` in the illustration) and two Sphere GameObjects (`C` and `D` in the illustration).
* Light `A` affects Sphere `D`, but not Sphere `C`. Light `B` affects Sphere `C`, but not Sphere `D`.
The following illustration shows the example:

*Light `A` affects Sphere `D`, but not Sphere `C`. Light `B` affects Sphere `C`, but not Sphere `D`.*
To implement the example:
1. [Enable Rendering Layers](#enable) in your project.
2. Create two Point Lights (call them `A`, and `B`) and two Spheres (call them `C`, and `D`). Position the objects so that both Spheres are within the emission range of Lights.
3. Go to **Project Settings > Graphics > URP Global Settings**. Rename Rendering Layer 1 to `Red`, and Layer 2 to `Green`.

4. Select Light `A`, change its color to green. Select Light `B`, change its color to red. With this setup, both Lights affect both Spheres.
5. Make the following settings on Lights and Spheres:
Light `A`: in the property **Light > General > Rendering Layers**, clear all options, and select `Green`.
Light `B`: in the property **Light > General > Rendering Layers**, clear all options, and select `Red`.
Sphere `C`: in the property **Mesh Renderer > Additional Settings > Rendering Layer Mask**, select all options, clear `Green`.
Sphere `D`: in the property **Mesh Renderer > Additional Settings > Rendering Layer Mask**, select all options, clear `Red`.
Now Point Light `A` affects Sphere `D`, but not Sphere `C`. Point Light `B` affects Sphere `C`, but not Sphere `D`.

## How to use Custom Shadow Layers
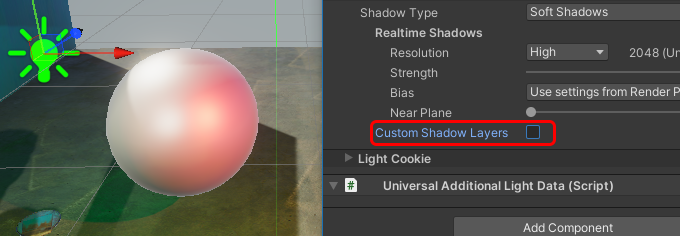
In the illustration above, Light `A` does not affect Sphere `C`, and the Sphere does not cast shadow from Light `A`.
The **Custom Shadow Layers** property lets you configure the Scene so that Sphere `C` casts the shadow from Light `A`.
1. Select Light `A`.
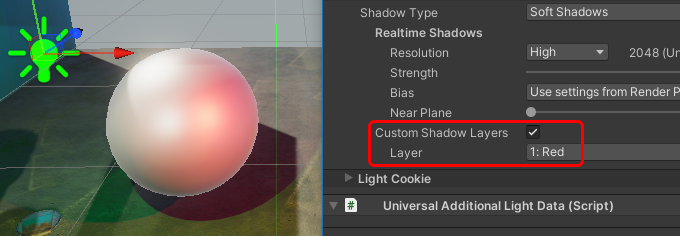
2. In **Light > Shadows**, select the **Custom Shadow Layers** property. Unity shows the **Layer** property.
3. In the **Layer** property, select the Rendering Layer that Sphere C belongs to.
Now Light `A` does not affect Sphere `C`, but Sphere `C` casts shadow from Light `A`.
The following illustrations show the Scene with the **Custom Shadow Layers** property off and on.
## How to use Rendering Layers with Decals
This section describes how to configure the following application example:
* The Scene contains a Decal Projector.
* The Decal Projector projects a decal on the wall and the ground, but not on the paint bucket.
The following illustration shows the example:
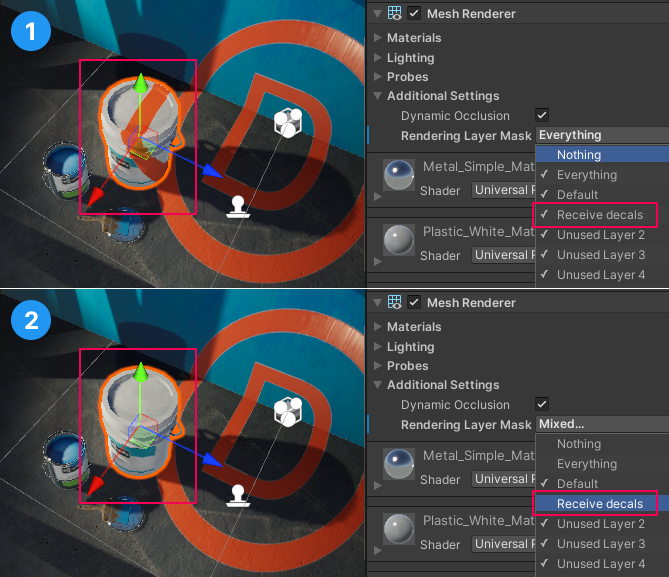
*In image `1`, the paint bucket has the `Receive decals` layer selected. In image `2` it does not, so the Decal Projector does not project on the bucket.*
To implement the example:
1. [Enable Rendering Layers for Decals](#enable-decals) in your project.
2. [Create a Decal Projector](../renderer-feature-decal.md#how-to-use-the-feature) in the Scene.
3. Go to **Project Settings > Graphics > URP Global Settings**. Add a Rendering Layer called `Receive decals`.
4. Select the Decal Projector. In the Rendering Layers property, select `Receive decals`.

5. Select the paint bucket GameObject. In the **Rendering Layer Mask** field, clear the `Receive decals` layer. Now the Decal Projector does not affect this GameObject.
## Performance
This section contains information related to the impact of Rendering Layers on performance.
* Keep the Rendering Layer count as small as possible. Avoid creating Rendering Layers that you don't use in the project.
* When using Rendering Layers for decals, increasing the layer count increases the required memory bandwidth and decreases the performance.
* When using Rendering Layers only for Lights in the Forward Rendering Path, the performance impact is insignificant.
* Performance impact grows more significantly when the Rendering Layer count exceeds a multiple of 8. For example: increasing the layer count from 8 to 9 layers has a bigger relative impact than increasing the layer count from 9 to 10 layers.